ABOUT THE OLD ENGLISH SHEEPDOG


Historical origins of the Old English Sheepdog are obscure but it is thought to be a combination of the Scottish Bearded Collie and the South Russian Owtchar.

The Old English Sheepdog breed has been around since at least the 1800's and achieved official breed status in 1873 with the founding of The Kennel Club in England.

The first Old English Sheepdog came to North America around 1885 and achieved official breed status with the American Kennel Club in 1888.

In the early 1900's, the Old English Sheepdog made its way into the hearts of people across most of Europe

The OES, also known as the Bobtail, had their tail 'docked' or 'bobbed' to signify that they were working dogs and therefore were exempt from taxes. Today the tail continues to be docked to preserve the tradition of the breed.


BRING YOUR DOG HOME

BEFORE GOING INSIDE YOUR HOME
Take your dog for a long walk around your neighborhood and around your yard. This lets your new dog know where he is and he won’t be uncomfortable inside “the walls”.

IF YOU HAVE OTHER DOGS .... Introduce your animals to each other outside your home. Dogs are territorial and may be aggressively defensive. Meeting outside their territory lets them become acquainted in a neutral area. Take them all for a walk together before going inside.

FIRST TIME INSIDE THE HOUSE .... Show your dog around the house under control of a leash. Then let the dog off the leash to explore the house on his or her own.

TALK TO YOUR DOG .... Let your dog get to know you by talking to him or her in full sentences in a friendly voice. Say your dog’s name often.

FEEDING …. Large breeds need to eat twice a day. A very small meal in the morning and the larger meal in the evening. Always take the dog for a walk immediately after they eat. They need to go “potty” after each meal. That’s just the way a dog’s digestive system works.

ACCIDENT IN THE HOUSE .... The dog may have an “accident” in the first day or two because he doesn’t yet know the allowable place to go. Take the dog outside and stay with him until he goes. Then praise him.

REGULAR SCHEDULE …. Your new family member doesn’t like surprises. Eating time, eating area, sleeping and going outside time. Establish a reasonable schedule and stick to it.

TETHER AT NIGHT …. (Optional) If your new family member is restless at bedtime, use a short tether next to your bed. Your dog wants to be where you are. If you use a tether for the first two or three days, the dog will not be tempted to have an “accident” and will become accustomed to where he or she should be.

MOST OF ALL – LOVE YOUR DOG …. Everything is new and your new family member is scared. If you build a trust and friendship, your dog will do anything for you. Unlike popular belief, your dog does not think of himself as a person – he thinks of you as another dog.

FAQ

  • TXOESR pays for all vetting
  • TXOESR does NOT support the use of any shock collar or prong collar of ANY kind
  • Dogs are NEVER left outside while no one is home
  • Dogs are NEVER left unattended around a swimming pool
  • Dogs are never sent away to a board and train facility
  • Foster families will have the first option to adopt their foster dog
  • TXOESR will handle all contracts and money transactions
  • Foster families do not have the authority to arrange for a dog to be left at a potential owners home
  • Foster families do not have the authority to adopt out a dog to a potential owner
  • TXOESR will make all final adoption decisions
  • Spaying & Neutering

All adult dogs will be spayed or neutered once settled in the foster home. No puppies are to be spayed or neutered until they are at least one year old (male) or when the female has completed her second cycle. It is much healthier for the dog to be altered once they have matured. Owners will sign an agreement to our terms.

TOP 12 TOXINS IN THE KITCHEN
  • Unbaked bread
  • Dough/Alcohol
  • Grapes & Raisins
  • Xylitol/Sugar-Free
  • Gum/Candy
  • Onions & Garlic
  • Human Medications
  • Compost
  • Fatty Table Scraps
  • Macadamia Nuts
  • Household Cleaners
  • Chocolate

MAINTENANCE


DAILY


  • Clean away any "sand man" deposits from eyes.
  • Reason: If the deposits are not cleared away from the skin, the moisture will attract bacteria. Bacteria will produce an infection, and a trip to the veterinarian will be in order.
  • Check hair around eyes to see if there is any debris caught in the hair. Reason: If there is a leaf or small twig, etc. caught in the hair, the sheepdog cannot, because of the density of the hair, remove it by pawing at it. If anything is rubbing on the eye, this can produce lacerations on the eyeball. A trip to a veterinarian specializing in ophthalmology will have to be made.
  • Fresh food and water.
  • Water at all times!!!! Good dry kibble. The best diet you can give your dog is a good dry kibble food!!! No human food!!! No changes from brand to brand!!! Any change in food with a sheepdog usually means instant diarrhea!!!! Reason: Your dog deserves it. Diarrhea will dehydrate your dog and can decrease its immunity to fight off colds, and diseases. Meanwhile, who needs to clean up the mess, especially when you've come home from a hard day at the office!

WEEKLY


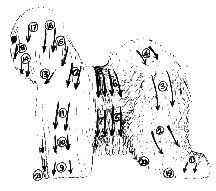
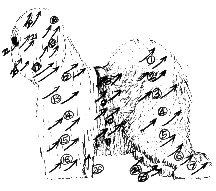
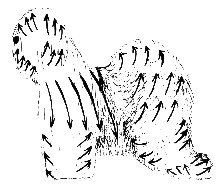
  • Complete de-matting of the entire dog. This can be done, within a reasonable time, by doing the following:
  • Comb (with the grain), using a mat splitting comb, until you have broken up all the mats. Pay particular attention to behind the ears, the chest, under the stomach, and the rear.
  • Then use a medium or small Universal or small Warners slicker to remove the broken up mats. If the hair is 4 inches or less, you can brush with the grain. If the hair is longer than 4 inches, you must brush against the grain. You must be able to see the skin!
  • After the first two bullets, you should be able to pass a medium tooth comb through the hair; if not, start over.
  • Reason: If anything gets underneath the mat (flea, tick, parasite, etc.), the density of the coat, does not allow the dog to be able to get it. In most cases, the dog will try to remove it, but will only inflict damage to it's own skin. This can cause "hotspots", and must be treated by a veterinarian. Hotspots that are not treated promptly can attract flies looking for a warm moist place to lay eggs - hence maggots which can be fatal.

MONTHLY


Heartworm prevention pill.
 

Reason: An ounce of prevention is worth a pound of cure.

QUARTERLY


Note: You may wish to have all of the items below done by a groomer. They are listed here so that you will know what must be done, and can pass this information on to your groomer. Do not assume that all groomers know how to groom an Old English Sheepdog!
  • Ears
    • Pluck the hair from inside the ears. This can be done with ear powder, and your fingers; a hairmostat might be needed in some cases. Most dogs do not enjoy this, but there is no pain!
    • Clean the ears with an ear cleaning liquid. Hold the dogs head firmly, and tilt to one side. Then pour solution in ear, massage, and wipe clean with cotton balls and cotton swabs. Do not go too deep with cotton swabs!
    • Reason: If the hair is not removed. The hair within the ear will mat. The mat will prevent the hair from growing out. If the ear is not cleaned, the ear becomes a breeding ground for parasites, and yeast infections. Here comes another trip to the veterinarian.
  • Feet
    • Trim hair between pads of feet.  This can be done with a blunt nose scissors.  Groomers will usually do this with a special trimmer blade.
    • Reason: If the hair between the pads is not removed, it will also mat.  The mat will retain moisture, providing a breeding area for bacteria, and the inevitable ulcer of the skin.  That is actually the least of the problem. If the hair continues to mat and grow, it can become very painful.
    • Trim all nails. A standard dog nail trimmer can be used.  Care must be taken not to trim into the quick (the pink).  This will cause bleeding, and must be stopped by use of a styptic powder. Some sheepdogs have "due claws".  These must be trimmed!  Do not attempt to trim nails without "quick-stop" or a similar product within reach!
    • Reason: Most sheepdogs like to bat you with their paw to get attention.  Once you have been clawed by a sheepdog with long nails, you will understand why.  If the due claw is not trimmed, along with hair mats, the due claw will have no other place to grow except into the skin!!!  Does this mean another trip to the veterinarian?? You're catching on!
    • Trim hair around feet.  The hair around the feet should be trimmed flush with the ground.  The easiest way to perform this task, is to have your dog standing on a grooming table.  Hold his head up with a leash suspended from the ceiling or grooming pole.  Tell him to "stay".  At this point, you are "in control". Now comes the easy part. Hold one of the paws in the air, and trim the others.  By holding one foot up, you can usually trim the others with a minimum of effort.
    • Reason: If the hair is not trimmed around the feet, the dog will slide on slippery floors, track additional junk into the house, and in general not look too sharp.
  • "Private" areas
    • Males: Trim the hair at the penis, as well as in front of.  The urine must have a clear shot to leave the body, without being absorbed by the hair.
    • Females: Trim the hair at the vulva.  Give the urine a place to go!

    Reason:  When the hair absorbs the urine, two things happen.   Neither of them any good.  First, the odor will knock your socks off!! Second, we are once again providing an excellent breeding ground for bacteria, and parasites.  I'm getting tired of going to the veterinarian


  • Trim rear

    Trimming the rear is very easy.  The hard part is to describe how it is done.  To start with, the dog must be completely de-matted, and combed out.  From this starting point, comb the hair to the rear and over the rump.  After you have the hair laying across the rear, find the "vent" and raise the hair with one hand while placing your other flat against the rear.  This will give you an idea, as to where you want to cut.  Cut all the hair hanging over the "vent" so that only one inch hangs below it.  If you have a clipper; clip all the hair around the "vent".  Always clip away from the "vent", never towards it.  Give the feces a place to go!


    Reason: The obvious one; that your dog is going to smell like a barn! There is also a health reason. If the feces gets caught in the hair, you can bet that soon there will be fleas, flies, and maggots! Oh, yes I almost forgot, another trip to the vet.


  • Bathe & dry

    The most important part of the bath is the preparation. The worst thing you can possibly do is to bathe the dog before you de-mat and comb it! If you bathe it before de-matting; please accept the fact that you will probably have to shave the dog!  The mats will harden and tighten as if they are concrete!

    • De-mat and comb out the dog.
    • Place large rubber mat in tub.
    • Have plenty of towels ready on floor.
    • Have good dog shampoo ready.
    • Have good tearless dog shampoo ready.
    • Have largest nylon choker collar with double spring hook ready.
    • Have 2 cotton balls ready.
    • Have a hand held shower set up.
    • Place dog in tub, and secure with choker strung through soap dish and hooked with double spring hook. This should keep dog's head in center of tub. Note: Some owners simply take the dog into the shower with them.
    • With hand held shower, soak dog completely, except for the head.
    • Douse with shampoo, and scrub all over with your fingers or a sponge.
    • Place a cotton ball in each ear.
    • Wet head with hand held shower.
    • Apply tearless shampoo to head, and scrub head.
    • Rinse with hand held shower until the drain runs clear!
    • Rinse again!!!!!!!!  Do not leave one speck of shampoo on dog!
    • After dog is rinsed, squeeze out as much water from the coat as you can.  Remove cotton from ears, then dry with the towels as much as you can.  After this, if you have a dog dryer, you can dry the dog with the dryer.  Otherwise, you will have to wait for "mother nature" to finish the drying.  Do not leave the dog in a cold draft during this drying time.
    • When the dog is dry, a final touch up with a pin brush or a slicker will put the finishing touches on the dog.  Reason: Pride - pride - pride! The pride you will have in your beautifully groomed, clean sheepdog is all the reason necessary!  Make sure you tell your sheepdog how gorgeous he/she looks!

SEMI ANNUALLY


Shave/Strip:

  • If desired, shave with a number 4 blade all over. This can be done in the spring, and fall of the year. Or,
  • Puppy cut by hand to 1 1/2 or 2 inches.
  • Reason: Maintenance will be much easier! Possible skin problems or growths can be seen, and treated. On certain Old English Sheepdogs this can be done more often because of skin problems or ease of maintenance. Note: Some diehards prefer to keep the hair long all year. These people don't have to work or they have no time for any social life at all!

ANNUALLY


Veterinarian visit: (You finally get to go - again!)

  • General physical
  • Heartworm check (occult)
  • Internal parasite check (bring stool sample)
  • Distemper-hepatitis-leptos pirosis-parainfluenza-parvo virus- vaccination
  • Bordetella inoculation
  • Rabies vaccination
  • One year supply of heartworm pills. Reason: Most health problems that are caught in the early stages are easily treatable. Many kennels will not accept a dog unless it has had the bordatella immunization 2 weeks before boarding! (Also, giving heartworm year round may also appear to be excessive, but if you have to go to Florida with your dog in the middle of January, do you really want to worry about heartworm?)
As you can see, owning an Old English Sheepdog is very time consuming, costly, or both. If you have neither the time nor the finances to maintain this dog, the consequences described above are what you can expect to happen.
  • First, the dog will become matted.
  • Followed by feces stuck to the rear end.
  • Followed by smelling like a barn.
  • Followed by removal from your house.
  • Followed by being tied outside.
  • Followed by your feeling guilty that it is not fair to the dog.
  • Followed by your giving the dog up to someone or someplace.
  • Followed by your children crying and not understanding why doggie must go.

These notes are provided as an aid, particularly for novice groomers. There are many ways of grooming the OES and clearly everyone adopts their own style as they gain experience over the years. I have indeed been fortunate to learn from several fellow exhibitors over my 18 years of experience with the breed, which I now hope to share with you through the following hints/tips. For convenience I have divided the notes in to 3 main sections covering:
  1. Pet grooming
  2. Show grooming
  3. Ring presentation
Hopefully by dividing the notes in this way you will be able to extract the relevant section to suit your needs. Diagrams have been included to help illustrate the techniques described, and I am grateful to Bertie Pennie for drawing them.

GROOMING

  • General Comments

    Dogs should be taught from an early age to lay down whilst being groomed, both for their own comfort and that of the groomer.  In preference a grooming table should be used, although any table top with a non-slip surface or cover would suffice. Alternatively, if this is neither practical nor convenient the dog should be taught to lay on a blanket on the floor whilst being groomed. Grooming sessions are better if they are shorter and perhaps more frequent rather than too prolonged, in order to prevent frustrations and rising tempers if a lot of grooming is required.

  • Pet Grooming

    Many people who own Old English Sheepdogs as pets, often end up clipping them off because they are unable to maintain the level of grooming required. Clipping is not necessary under these circumstances and hopefully the following tips will help to maintain an apparent fully coated dog. Basically by using a comb to strip the undercoat from the dog, the coat can be maintained at full length or part length if trimmed periodically rather than stripped. For this purpose I personally find a smaller sized medium toothed comb with a handle being the best for the job. The technique is quite simple, and as explained in the general comments above, it is more convenient if the dog is laying down preferably on a grooming table or alternatively on a blanket on the floor.


    Referring to 'Diagram 1', starting with the outside edge of the rear leg, lift the coat to expose the lower 1-2 inches of coat just above the pads, now begin to gently comb through the hairs to ensure that this section of coat is free of tangles. If the coat is heavily knotted then this should be eased before combing by gently using both thumbs and forefingers to tease the knot apart so that the comb will not pull too heavily against the knotted coat (remember how you feel when you get a small tangle in your own hair and try to comb it). From this starting point, gradually work your way up the outside edge of this leg and around the rear quarter of that side. Then following the same process, recommence from the inside edge of the other rear leg, gently lifting or moving forwards/backwards the other rear leg to enable you to comb the coat up to the underside of the dogs body.


    Having worked so far with the legs you should then commence with the main body of the dog starting from just in front of the rear leg and working in convenient strips upwards and along the body to the front legs and shawl. By this point if you have not dealt with the underside of the dog between the front and rear legs then it should be done at this stage.


    Next you will need to start to work on the outside edge of the front leg, remembering that most dogs in this breed have a great deal of sensitivity along their front legs, particularly up the front edge - so take extra care and be gentle. In the same way as you worked up the back legs, start again with the front working from the bottom up, and then repeat on the inner edge of the other front leg. Care should be taken to ensure that the chest area between the front legs is also gently dealt with to clear any knots from this area which tends to be prone to severe knotting.


    From here you should work upwards through the shoulders and chest to the neck, until only the head remains on this side.


    Sometimes for personal convenience at this point, I start the other side of the body leaving the head to be dealt with completely at the end. However, for the purpose of these notes I will deal with the side of the head at this stage.


    The head itself is not particularly easy to comb and also includes many sensitive areas. It is probably easier to start from the neck and chest working from the lowest point upwards towards the mouth and ear. Leaving the ear flap for now, continue to work upwards around the head to the top gently working around the side and top of the nose and then carefully around the eyes, being particularly gentle at this point. Now for the ear flap, starting at the top of the ear on one edge, very carefully work your way around the edges of the ear flap, you must be very gentle at this point and tease out as much as possible before using the comb, as bleeding can easily occur from these areas if you are too heavy handed. You can then work upwards across the outside edge of the ear flap, then turning it over to carefully deal with the inner edges. Whilst the ear flap is turned over, it is a useful opportunity to check the ear making sure that it is clean, and that any soft brown hairs are gently plucked from the ear.


    The dog should now be turned over and the whole process repeated for the other side.


    By now the whole body of the dog has been groomed and some final finishing points can be carried out. The hair between the pads should either be combed carefully and trimmed flush with the pads, or carefully clipped away altogether, depending upon personal preference. The genital areas of the dog/bitch should also be trimmed carefully around the edges to reduce the opportunities for knotting and infection. The hair around the anus should be trimmed away back to the skin for approximately one inch all around it. Finally, the opportunity should be taken to check that the claws are not in need of cutting, if they do, then in preference use guillotine type nail cutters to trim them back, cutting small amounts regularly and not cutting back to the 'quick'.


    Having taken the trouble to clear the dogs coat in this way, weekly brushing with a stiff brush will help to maintain the appearance between these major grooming sessions. On average if you comb the coat once a month, with a good brush each week, you will probably find that it will be alright. However, you should remember that all dogs are different and you will need to learn and respond to what is right for your dog.

  • Show Grooming

    Again taking note of the earlier general comments, lay the dog down. The tools for grooming and maintaining a 'show' coat are somewhat different. I personally find that a 'Mason & Pearson' type of 'bristle & nylon' brush is the main item, supplemented with combs of fine, medium and coarse teeth and additionally a good pair of scissors.


    For the purpose of grooming a dog to be presented in the show ring, I personally believe they should be totally free of knots. To achieve this depth of grooming without excessive and unacceptable loss of either undercoat or length of top coat, considerable care and time must be taken.


    This time referring to 'Diagram 2', starting from a point just above the anus, begin to separate the coat in to small sections, brushing carefully from the roots away from the dog. This method allows each section to be brushed over previously brushed coat thereby ensuring that all knots are found and brushed during the grooming session. From this starting point, work gradually around the rear quarter and down the outside edge of the rear leg, and repeating for the inside edge of the other rear leg although at the top you will not be able to brush the coat 'away', therefore you should take extra care to ensure that all of the coat in this area has been brushed. Then working in sections along the side of the body, starting at the top of the back and working down to the underside, this should be repeated until the neck, shoulders and chest have been included. The front legs should then be groomed starting from the top outside edge and working downwards to the bottom, then repeating for the inner edge of the other front leg. The same difficulty will be found between the front legs as the back in as much as the coat cannot be brushed 'away' and should be carefully brushed in this potentially knotty area.


    Now the side of the head can be groomed, starting from the top point just above the neck and working down and around the ear flap to include the nose and lower jaw. Finally the ear flap can be dealt with by continuing the process of brushing 'away', starting at the top of the ear flap and working down to the tip, and then turning over to brush around the inner edges. At this point the ear should be checked for cleanliness and any soft brown hairs plucked out.


    The dog should now be turned over and the whole process repeated for the other side.


    Once the main grooming has been completed, as with 'pet dogs', the hair between the pads should be attended to, the claws checked and the hair trimmed around the genital and anal areas.


    After the main grooming has been carried out, a certain amount of preparation can be carried out that will enhance the presentation in the ring. Many people will debate the use of scissors or whether the ends of the coat should be 'trimmed' by breaking the coat between thumbs and forefingers. However, I personally find scissors helpful and acceptable, but do not like to see a 'scissored' finish to a presented dog. Bearing in mind the desired 'shape' that is dealt with in the next section, it is often helpful to lightly trim and shape the ears and head as well as around the back and feet, this should not be excessive or appear scissored, and will take years of practice to achieve but often the breeder or fellow exhibitors will help you if you ask.


    Apart from shaping/trimming, the shoulders and neck should be stripped out by using a coarse toothed comb to ease out some of the undercoat, leaving the shoulders slim rather than thick with dense coat. The fine toothed comb should be used very carefully so as not to break the coat or remove too much undercoat, working around the mouth and chin, around the edge of the ears and around the feet. Finally, using either the medium or coarse toothed comb, the undercoat should be eased by carefully combing below the anus to the top of the rear legs to enable the coat in this area to lay a little flatter to the body.

  • Ring Presentation

    This particular section of these notes will enter in to areas of controversy and debate. Currently there is tremendous effort to achieve a high level of finish to the ring presentation of Old English Sheepdogs. However, it should be remembered that in previous years this was not the case, and many people hold differing views regarding the style of presentation, and it is up to each person to develop their own style and to suit the particular judge under whom they are showing. Personally, I feel very strongly that it is up to the judge to examine the dog for its qualities and not necessarily its presentation, only perhaps using this factor in the unlikely situation that they can not differentiate between the qualities of two dogs. The presentation aspect to me reflects the fact that dog shows are also spectator/public events, and for that purpose are in effect almost beauty competitions. There may be many people who disagree with these particular views, but they are personal and reflect my own views and beliefs.


    Overall in presenting the dog for the show ring, the intent is to create a pear shape appearance to the body and emphasize the size of the head, retaining slim shoulders and good neck with the front legs fluffed out, whilst the rear legs, hocks and feet are also groomed to advantage.


    Referring to 'Diagrams 3 & 4', with the dog stood, commence by shaping the rear body of the dog, brushing the coat upwards and outwards to increase the base of the pear shape, this extending down the rear legs to just above the hocks. The shoulders, chest and neck should be brushed as close as possible to the body perhaps using a fine water spray to stop the coat 'flying'. The front legs should be brushed upwards and outwards , whilst the hocks should be groomed to emphasize their shape and size as indicated in diagrams 3/4. Finally the head, ears and muzzle should also be brushed upwards and outwards to emphasize the overall size of the head. Clearly notes are no substitute for actual practice and it may take a considerable time before you are satisfied with your efforts.


    Diagram 4

    Having described the basic idea, this can be supplemented, if desired, by an element of 'back-brushing'. This technique is no substitute for quality of coat, but I feel that it does allow for an enhancement of the final finish in relation to the appearance of the dog perhaps in the 'beauty competition' element, and a judge should never be deceived by an exhibitors clever brushwork. By using light back-brushing around the rear quarters of the dog along with its head, a more professional finish can be achieved. I am sure that many of us have stood at the ring-side before and admired dogs in the ring, occasionally being deceived by good presentation rather than a quality dog. I am sure that this is often the reason why we see a well presented dog which does not win and who is beaten by one who is not so well presented, a totally correct decision.


    It should also be noted that there are some judges who do not allow brushes to be used within the ring, and this in itself is a statement that they will not be deceived by presentation and care more about the quality of the dog itself. Often in these situations back-brushing is inappropriate, but your hands can be used to good effect, again achieving the basic desired shape as described earlier in this section.


    There are many techniques that can be used in ring presentation, and only a few examples have been indicated here. You should be prepared to look and listen in order to learn and extend your knowledge, you will never know it all, so always be prepared to learn more, consider other methods, and last but not least respect other peoples views and opinions - it takes all sorts and styles in showing.

  • Grooming Preparations

    In giving a couple of tips here, you should always be familiar with the Kennel Club Rules on this issue, which basically do not allow for any preparation to be used which will change either the color, texture or body of a dogs coat.


    A fine spray of water to aid their preparation for the show ring is all that is currently allowed by the Kennel Club. Trade stands and pet shops are full of products to tempt you - just beware of the K.C. rules.


    In concluding these notes, I hope that they will be of help to you, and would encourage you to copy them and pass them on to others who may benefit from them. As I have previously said, I do not consider myself to be an expert, just rather fortunate to have had the opportunity to learn from fellow exhibitors, and I am indebted to them for their tuition, help and support over the last 15 years.


    Bob Martin

    March 1992 (updated April 1996)

CRATE TRAINING

CRATE TRAINING


There are many wonderful reasons to buy a crate for your new dog.

At the top of the list are his security and your peace of mind.
  • A crate is your dog's little den. Do you remember building a playhouse out of a huge box when you were a kid? You had fun in that little enclosure. You felt safe. The crate is your dog's playhouse.
  • Choose a size of crate that you'll be able to use for your dog when he is a fully grown adult. The full-grown dog must be able to stand, sit, turn around and lie down comfortably. Hopefully, your dog has come from a breeder or foster home who crate trained it or started crate training it. In that case, this dog already considers a crate it's home.


Crate training a dog is important for a number of reasons.
  • It will keep him out of trouble and makes him feel more secure about being left alone
  • If you have visitors who are afraid of dogs or service people working in the house, the crate will keep your dog from getting underfoot.
  • A crated dog cannot destroy your home. He cannot chew on an electrical cord and electrocute himself. He cannot find that bug poison you sprinkled under the bathroom sink and forgot about. He cannot got into the cleaning chemicals under your sink when you are not watching.
  • A dog's natural instinct is to chew, especially when he is teething. Just like a baby he will put anything into his mouth. Anything within the dog's potential range is a target. You wouldn't let a toddler run unsupervised in your home and help himself to anything. You shouldn't do it with a dog, either.
  • A crate is also where he learns to control his bladder and piddle outside. Dogs will usually make a great effort not to soil their den. If you take your dog out often, and praise him highly for doing his business outside, with the crate's help, he will housebreak sooner, with fewer accidents.
  • A crate is also a good way to keep your relationship with your dog positive. After all, if the little guy isn't running through the house, he cannot be doing things he shouldn't do. You come home, he's wagging his rear. You tell him he's great, calmly open the crate door and immediately take him outside. He relieves himself and you tell him he is wonderful. Lots of positive reinforcement here. There is no need for yelling and screaming when you get home to find he has trashed the house. There is no way he could trash the house, as he was safely confined to this crate.

If your dog has never seen a crate, introduce him to his new home slowly when he needs to take a nap. After he eats, he will want to relieve himself. After that, put him in the crate for nap time.
  • When the dog wakes up, he will bark because he needs to go out and doesn't want to soil his bed. Take him out, let him piddle, play with him for awhile. When he is tired and ready for another nap, put him back in the crate. The crate is like a baby's crib--it is a safe place to sleep, but is not the proper place for bathroom functions.
  • Your dog may start to whine or bark when he is locked in the crate. This is normal. The dog may be trying to tell you he has to go. If you are sure he doesn't need to relieve himself, ignore him. Some dogs will only fuss for a few minutes, others may bark for a while.
  • To make your dog more comfortable in his crate, put a washable, fluffy towel on the crate floor (don't use newspapers in the crate--this will only confuse the dog about the proper place to relieve himself). Put in a safe chew toy like a Kong or a Nylabone to keep him occupied.

It is also a great safety measure when traveling with your dog. A crate will also prevent the dog from jumping all over you while you are driving, causing an accident. Keeping an animal crated during travel also offers the dog added security in the event of an automobile accident. If you don't want to crate your dog during travel, pet stores now have safety belts for dogs.

Once you reach your destination, a crate provides your dog with a safe haven in a strange location. It makes you a more welcome guest since your dog won't be running wild through someone else's home or in the motel room. He'll be happier because he has his 'den,' your host will be happier since he'll have no accidents and you'll be happier because you won't have to apologize for puddles and ripped furniture.

The crate is not a place for punishment. It should always be seen by your dog as a wonderful, happy haven.

If you approach the crate as a necessity of dog ownership similar to the leash, collar and water bowl, your dog will accept it readily. It will become his little home. You won't have to worry about what he is doing when you aren't watching. And he is feeling safe while you are gone because he is in his den.
Share by: